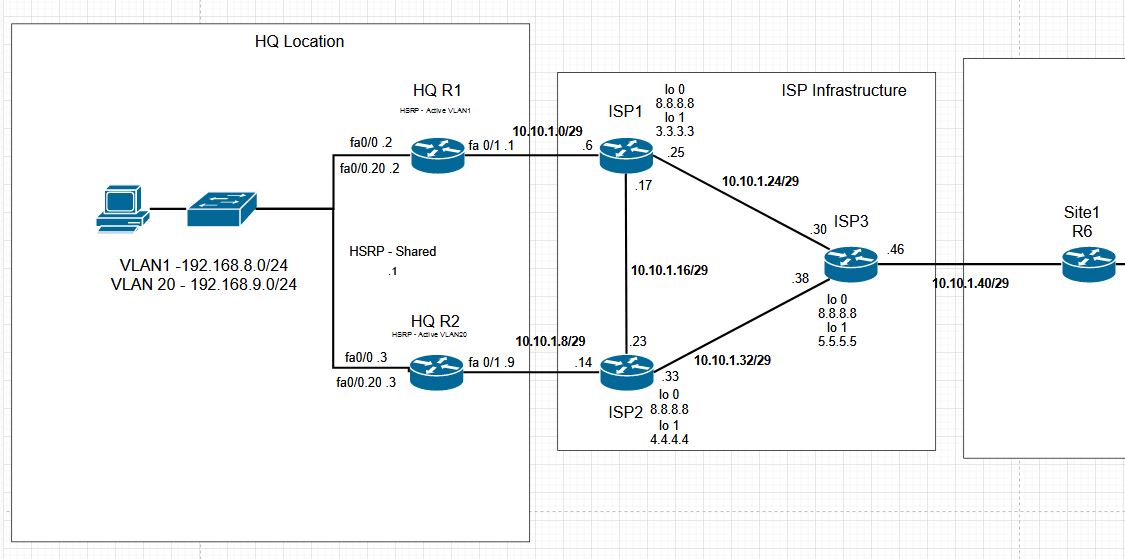
CCNP Topology Initial BGP
With OSPF working, each ISP router has routes to the loopback and networks on other routers. This IP connectivity allows us to set up our BGP relationships. As a side note, the Core exam for CCNP only requires that we do directly connected neighbors for eBGP. Instead, our topology is set up with peering between loopbacks. This is better from the standpoint of resiliency as we can maintain the BGP TCP connection, even if a directly connected link is down. Our IP addressing hasn’t changed so our network still looks like below.

The BGP Configuration
For each device the configuration is very similar, so we will again only be showing what we configured on ISP1. Once we show the basic configuration, we will show some verification that the BGP configuration is working. The result will be 3 BGP autonomous systems, and each will advertise its customer facing network.

ISP1 Router
All of our configuration is done under the router bgp 65001 configuration for our local AS. We didn’t use a peer group, so we need to do multiple configuration options for each remote router. We need to set up the neighbor AS so BGP knows the connection is eBGP. Once that is in place, we set a password, use the ebgp-multihop command, because we are using the remote loopback interface for peering. Last, we need to make sure we indicate our update source is our loopback interface, or the peering won’t establish.
The last thing we did after checking that the neighbors were up, was add a network statement to advertise the customer facing network to peers.

BGP Configuration Verification
Checking the ip bgp summary command will show our neighbors, and as shown below, indicates the number of prefixes we received from each. We also see the time the relationship has been established, and messages sent / received. Since we have received prefixes and don’t have messages in the queue, we are looking good.

The show ip bgp command will let us look at the prefixes we have received, and see what the next hop is for those prefixes. the > will identify the best route.

The routing table also shows that we have two BGP routes in the table. We can then select one of these networks and get more detailed information on why it is selected.

here the attributes show that due to shortest AS path we will use the peer 3.3.3.3 for traffic to the 10.10.1.0/29 network.

We can also verify that we can reach the remote customer facing network from our customer facing network.

With our HQ site set up, and the ISP infrastructure working, we can now set up our remote office.
